提示!本文章仅供学习交流,严禁用于非法用途,文章如有不当可联系本人删除!
一. 目标网站
aHR0cDovL3FnenBkai5jY29weXJpZ2h0LmNvbS5jbi9yZWdpc3RyYXRpb25QdWJsaWNpdHkuaHRtbA==
二. 准备工作
在正式介绍识别思路前,先来插入一个名词: "余弦相似度"
关于它,在某百科是这么解释的

应用到图像对比上,概括就是:两个图像用余弦相似度对比,阈值越高(值都是正的),相似度越高,反之亦然。
代码如下(出处:https://blog.csdn.net/weixin_39121325/article/details/84187453):
from PIL import Image
from numpy import average, dot, linalg

def image_similarity_vectors_via_numpy(image1, image2):
    images = [image1, image2]
    vectors = []
    norms = []
    for image in images:
        vector = []
        for pixel_tuple in image.getdata():
            vector.append(average(pixel_tuple))
        vectors.append(vector)
        # linalg=linear(线性)+algebra(代数),norm则表示范数
        # 求图片的范数??
        norms.append(linalg.norm(vector, 2))
    a, b = vectors
    a_norm, b_norm = norms
    # dot返回的是点积,对二维数组(矩阵)进行计算
    res = dot(a / a_norm, b / b_norm)
    return res
三. 解析工作
3.1) 拼图验证码长什么样
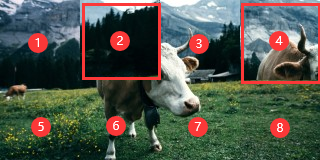
如上图所示,图片实际上被等分成了8小分,原图是320x160,每张小图是80x80,而第2和第4张小图是应该被交换的对象。
3.2) 识别思路
上面提到了图片是被拆分成8个部分,而每一次交换必定只有两张小图两两交换。每次交换前后,差别在于:被交换的两张图片与相邻图片的像素变连贯了,或者说被交换后的图片与相邻图片的余弦相似度比交换之前的更高了
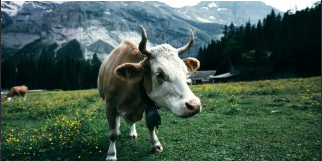
如何比:当然不是比整个80x80的图,而是比两个80x80图的相邻部分,这里我们以图3.1中的序号2为例,如果2和4交换,那么就会还原成图3.2,而2左侧边+1右侧边的的相似度,是比4左侧边+1右侧边的相似度来的低的,同理,2下侧边+6上侧边的相似度,是比4下侧边+6上侧边来的低的。
既然是相邻边,都各取边缘的1像素即可,我们先来测试下:
with open('3b27ef3b626e4330a116407525432198.jpg', 'rb') as f:
    binary = f.read()
img = cv2.imdecode(np.array(bytearray(binary), dtype='uint8'), cv2.IMREAD_UNCHANGED)

# 2左侧边+1右侧边
img2_left = img[0:80, 80:81]
img1_right = img[0:80, 79:80]
res1 = image_similarity_vectors_via_numpy(Image.fromarray(img1_right), Image.fromarray(img2_left))
print('2左侧边+1右侧边', res1)

# 4左侧边+1右侧边
img4_left = img[0:80, 240:241]
res2 = image_similarity_vectors_via_numpy(Image.fromarray(img1_right), Image.fromarray(img4_left))
print('4左侧边+1右侧边', res2)

# 2下侧边+6上侧边
img2_lower = img[79:80, 80:160]
img6_upper = img[80:81, 80:160]
res3 = image_similarity_vectors_via_numpy(Image.fromarray(img2_lower), Image.fromarray(img6_upper))
print('2下侧边+6上侧边', res3)

# 4下侧边+6上侧边
img4_lower = img[79:80, 240:320]
res4 = image_similarity_vectors_via_numpy(Image.fromarray(img2_lower), Image.fromarray(img4_lower))
print('4下侧边+6上侧边', res4)
测试效果如下:
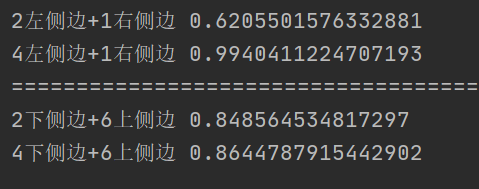
测试结果表明,对于指定顺序的交换前后,确实是交换后比交换前的相似度有提升,但是就像分界线下面一组的结果,相差并不大。而且众多的交换情景下,都有不同的边的组合要去比较,有些是需要比较两条边的,例如2,4交换,有些需要比较三条边,例如3,6。到这里打住,因为想想就觉得麻烦。
上面可以都看成废话,下面来说说我是怎么对比的。
3.2.1 有多少种交换方式
8张80x80的小图,两两交换,共有:(1+7)*8/2=28 种交换方式
3.2.2 比较的对象是哪些
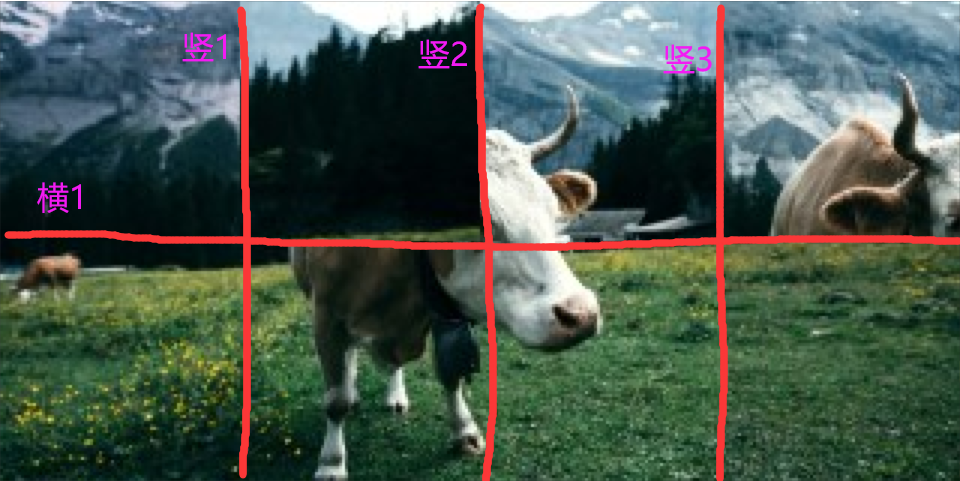
无论是哪两张小图交换,都会涉及到横1这条,以及竖1,竖2,竖3这三条线中至少一条包含的相邻边缘像素,那么对于上面这28种交换方式,直接无脑对比每一次交换后,这4条线余弦相似度,这4个值的平均值最高,对应的交换顺序就是要得到的答案。
- 先来生成一些可以写死的变量
# 从左到右从上到下分别为序号0-7  8个80x80小图的位置坐标
po_dict = {0: (0, 0, 80, 80), 1: (80, 0, 160, 80), 2: (160, 0, 240, 80), 3: (240, 0, 320, 80), 4: (0, 80, 80, 160), 5: (80, 80, 160, 160), 6: (160, 80, 240, 160), 7: (240, 80, 320, 160)}
# 28种交换可能
exchange_list = list(combinations([i for i in range(8)], 2))- 根据交换顺序,将图片还原成想要的样子
def restore_img(image, first_img_index, second_img_index):
    """
    根据交换顺序将图像还原成想要的样子
    :param image: 交换前的原图
    :param first_img_index: 交换的80x80小图 序号1 也就是上面po_dict里的key值
    :param second_img_index: 交换的80x80小图 序号2 也就是上面po_dict里的key值
    :return: 交换之后的图
    """
    temp_dict = dict()
    first_img_binary = second_img_binary = b''
    for k, v in po_dict.items():
        temp_dict[k] = image[v[1]:v[3], v[0]:v[2]]
        if k==first_img_index:
            first_img_binary = image[po_dict[second_img_index][1]:po_dict[second_img_index][3], po_dict[second_img_index][0]:po_dict[second_img_index][2]]
        elif k==second_img_index:
            second_img_binary = image[po_dict[first_img_index][1]:po_dict[first_img_index][3], po_dict[first_img_index][0]:po_dict[first_img_index][2]]
    temp_dict[first_img_index] = first_img_binary
    temp_dict[second_img_index] = second_img_binary

    new_temp_dict = dict()
    for x, y in temp_dict.items():
        new_temp_dict[po_dict[x]] = y

    blank_image = np.zeros((160, 320, 3), np.uint8)  # 这里是 高 宽
    blank_image.fill(255)  # 白底

    for m, n in new_temp_dict.items():
        blank_image[m[1]: m[3], m[0]: m[2]] = n
return blank_image- 获取交换后的这四条边的余弦相似度
def get_four_cosine(blank_image):
    upper_img_point = blank_image[79:80, 0:320]
    lower_img_point = blank_image[80:81, 0:320]
    res = image_similarity_vectors_via_numpy(Image.fromarray(upper_img_point), Image.fromarray(lower_img_point))

    left_img_point1 = blank_image[0:160, 79:80]
    right_img_point1 = blank_image[0:160, 80:81]
    res1 = image_similarity_vectors_via_numpy(Image.fromarray(left_img_point1), Image.fromarray(right_img_point1))

    left_img_point2 = blank_image[0:160, 159:160]
    right_img_point2 = blank_image[0:160, 160:161]
    res2 = image_similarity_vectors_via_numpy(Image.fromarray(left_img_point2), Image.fromarray(right_img_point2))

    left_img_point3 = blank_image[0:160, 239:240]
    right_img_point3 = blank_image[0:160, 240:241]
    res3 = image_similarity_vectors_via_numpy(Image.fromarray(left_img_point3), Image.fromarray(right_img_point3))

return res, res1, res2, res3- 以我上面
3.2中说的第二和第四张小图交换为例,然后你只需要对这28种组合排个序即可:
with open('3b27ef3b626e4330a116407525432198.jpg', 'rb') as f:
    binary = f.read()
img = cv2.imdecode(np.array(bytearray(binary), dtype='uint8'), cv2.IMREAD_UNCHANGED)
exchange_image = restore_img(img, 1, 3)
res, res1, res2, res3 = get_four_cosine(exchange_image)
average_cosine = (res + res1 + res2 + res3)/4  # 这是每一组交换要得到的余弦相似度的平均值
注意:这里的交换顺序是从序号0开始的,因此是1,3
- 有了上面这些代码,已经完成了80%的识别,还有20%的组装工作就留给大家去实际动手啦~
四. 测试与总结
- 有了上面的代码,来小测100次看看效果
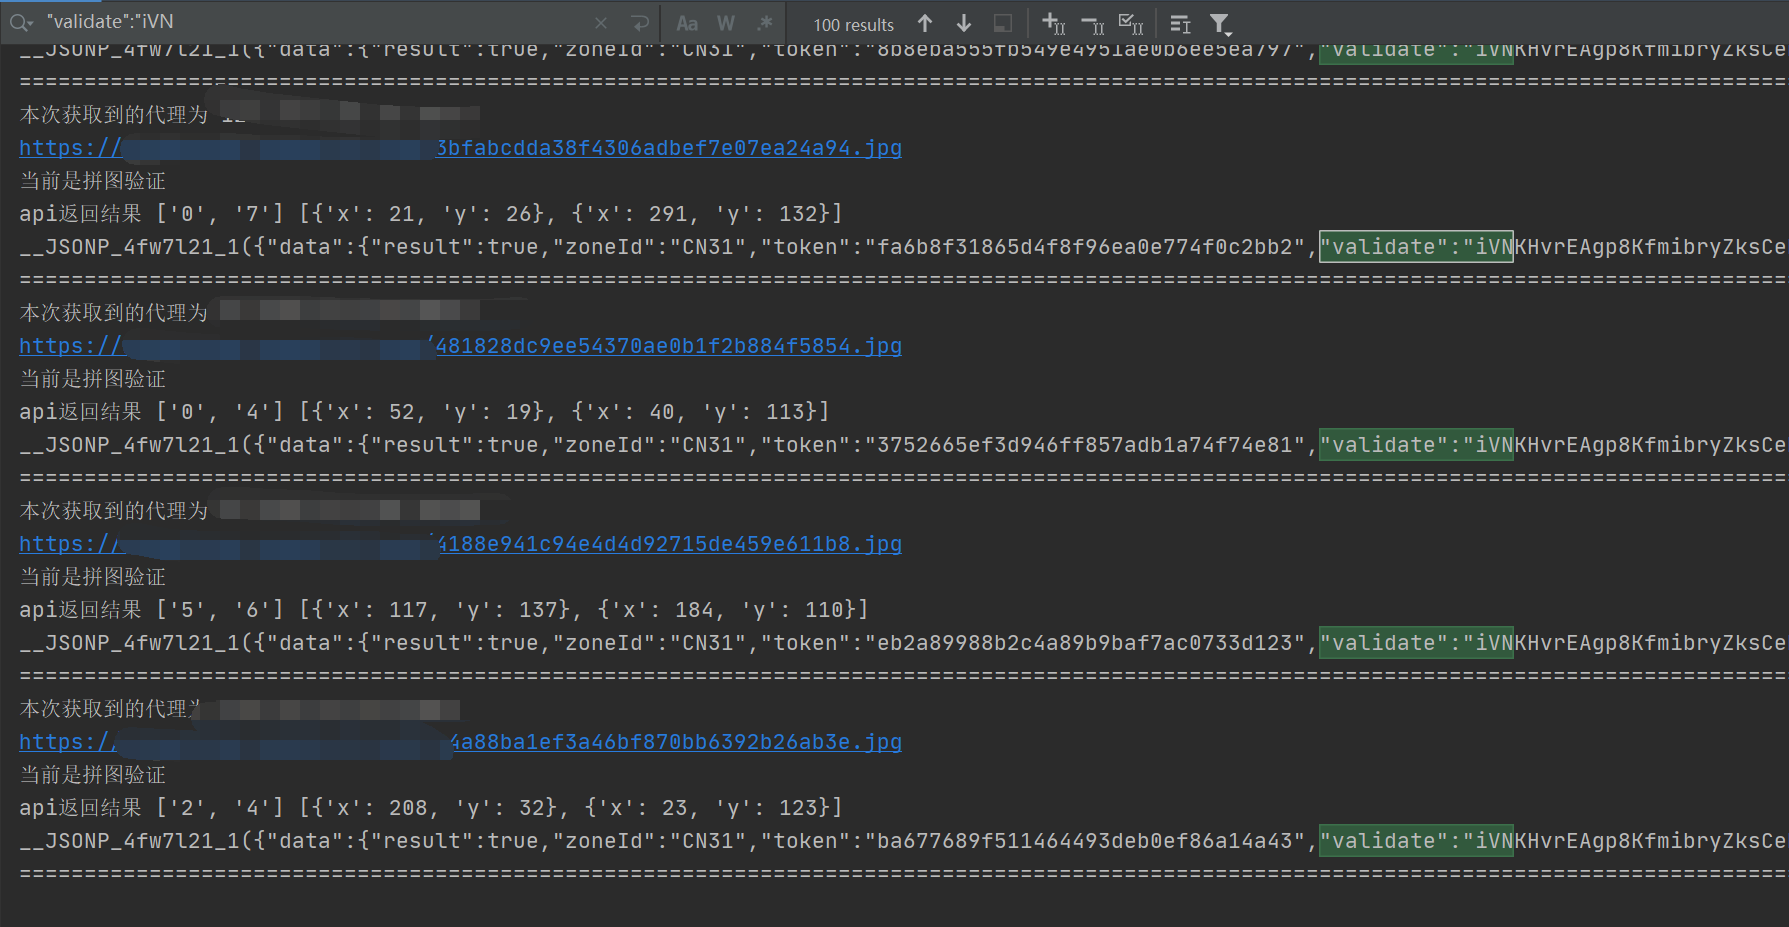
效果还行,那就先这样吧,能用就行
- 下篇预告:滑块还原类验证码识别,案例:aHR0cHM6Ly9jcmVkaXQuYWNsYS5vcmcuY24vY3JlZGl0L2NhcHRjaGEvZ2VuP3R5cGU9Q09OQ0FU
...
此篇完结~
